Uploading
This page explains how to upload data from the Excel Add-in into Oracle ERP Cloud. It covers how the upload process works, how to run uploads, how to run validation independently, and how Upload Actions determine which rows are processed.
How the Upload Process Works
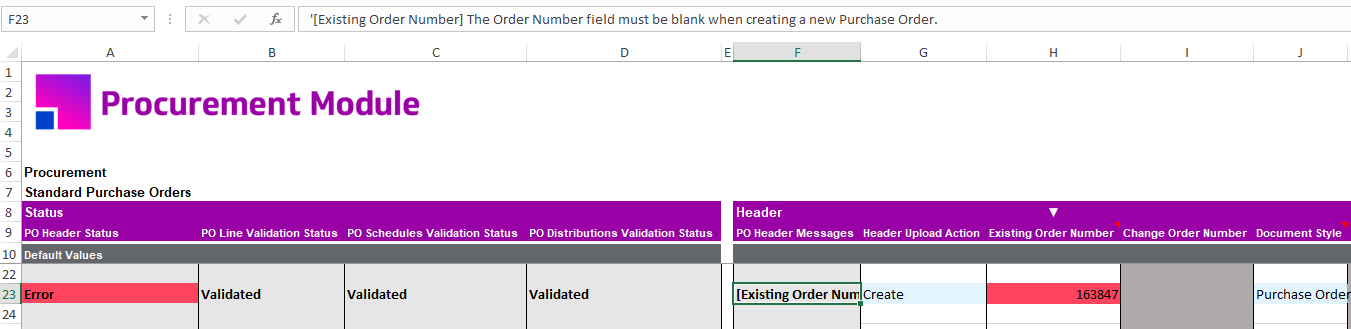
When an upload is initiated, the Add-in performs several validation steps to ensure data is ready to load into Oracle ERP Cloud.
Step 1 Module Validation
The Add-in first validates the data against the rules of the selected Integrator.
-
If validation succeeds, a Validated status is printed to the sheet.
-
If validation fails, an Error status and message are printed.
| A record will not upload if any validation step fails. Refer to the module-specific documentation for details on validation rules. |
Step 2 Oracle Web Service Validation and Upload
After module validation, the Add-in sends the record to Oracle ERP Cloud for further validation, and, if successful, will commit it to Oracle.
-
If Oracle accepts the record, an Accepted status is printed.
-
If Oracle rejects the record, an Error status and message are printed.
For help interpreting results, refer to Status and Message Columns.
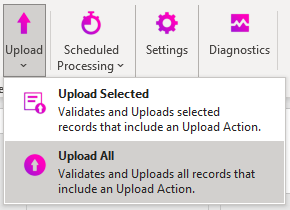
Running an Upload
Uploads can be initiated from the Add-in ribbon using either Upload All or Upload Selected.
Only rows with an Upload Action will be processed.
Upload All
Uploads all records in the active worksheet that contain an Upload Action.
-
No selection is required.
-
Rows without an Upload Action are ignored.
To run Upload All:
-
On the Add-in ribbon, click Upload.
-
Select Upload All.
The upload proceeds as described in How the Upload Process Works.
Upload Selected
Uploads only the records you select in the worksheet.
This option is useful for testing or loading smaller data sets.
Key behaviour:
-
Selecting any row in a record processes the entire record.
-
Rows without an Upload Action are ignored.
-
Multi-row selection processes all associated records.
To run Upload Selected:
-
Highlight the rows to upload.
-
On the Add-in ribbon, click Upload.
-
Select Upload Selected.
The upload proceeds as described in How the Upload Process Works.
Running Validation (Without Uploading)
Validation can be run independently to confirm data quality before uploading.
Only rows with an Upload Action will be validated, unless they belong to a record that contains an Upload Action.
You can validate selected records or all records.
Validate Selected
Validates only the records you highlight.
To run Validate Selected:
-
Select the records requiring validation.
Selecting a single row still validates the full record that row belongs to. -
On the Add-in ribbon, click Validate
 .
. -
Select Validate Selected
 .
. -
Validation will run for the selected records.
-
Errors and messages will print to the sheet where applicable.
Or:
See Status and Message Columns for reprocessing guidance.
Validate All
Validates all records in the active worksheet that include an Upload Action.
To run Validate All:
-
Click Validate
on the Add-in ribbon. -
Select Validate All
 .
. -
Validation runs for all eligible records.
-
Validation statuses print to the sheet.
For resolving validation errors, refer to Status and Message Columns.
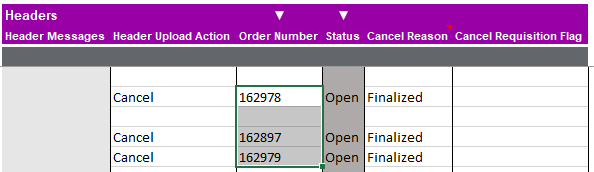
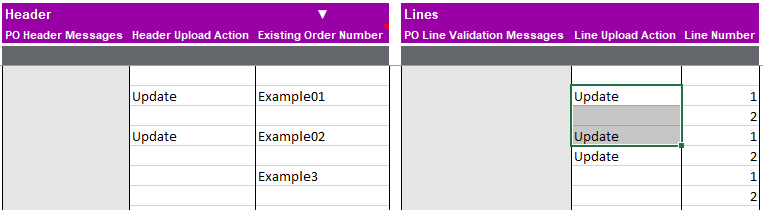
Upload Action Columns
Each section in an Integrator includes an Action column that determines what operation will occur during upload. Actions include creating, updating, or deleting records. Some products may have product specific actions where they are needed.
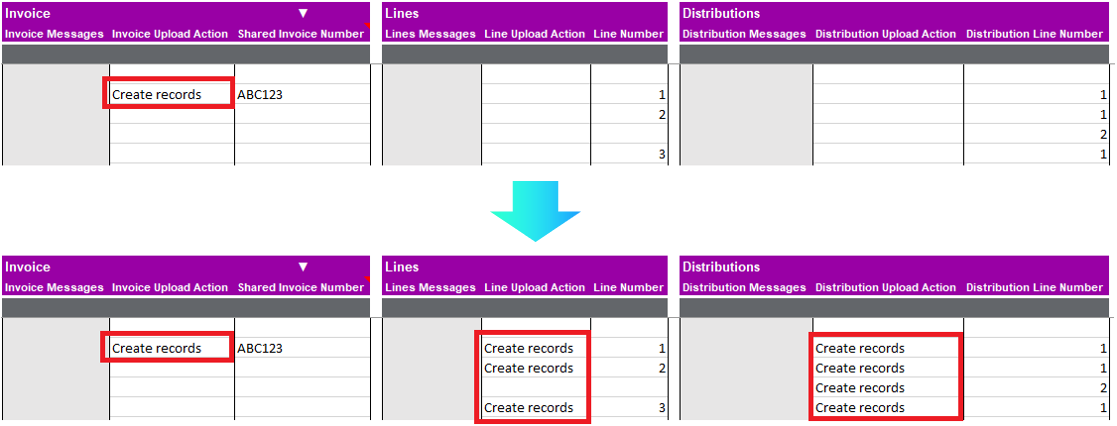
Create Records
Applies the Create action to all lower-level sections in the record hierarchy.
-
Can be applied at any parent level.
-
Existing explicit actions on the sheet are not overwritten.
Update Records
Defaults the Update action to all lower-level sections.
-
Does not overwrite existing actions defined in the sheet.
Delete
Marks the record for deletion.
-
Only needs to be applied once at the parent level.
-
All related lower-level rows are deleted during the upload.

| Upload Action values can be set using Default Row 10. See Default Row for more details. |